Install & Activation Info

Information Benchmarking My Systems Install & Activation Info Timeline NTFS File System Requirements Graphical User Interface The XP Family

Installing Information and Activation Info


              Release Notes for Setup
                Microsoft Windows XP Professional
                 (c) 2001 Microsoft Corporation. All rights reserved.


When installing a new operating system, you need to make several choices. The Windows XP Setup Wizard and this document guide you  through these choices. You also learn how to connect your computer
to a network.


These release notes describe how to run the Windows XP Setup Wizard and install Windows XP Professional on a single computer.


CONTENTS

   Before You Begin
         Hardware Requirements
         Checking Hardware and Software Compatibility
         Obtaining Network Information
         Backing Up Your Files
         Upgrading v. Installing a New Copy

    Running Windows XP Setup
         If You're Installing a New Copy (Clean Install)
         If You're Upgrading
         Collecting User and Computer Information
         Providing Networking Information
         Joining a Workgroup
         Joining a Domain

   Customizing Setup Using Unattended Setup Mode

   Starting Windows XP Professional
        Logging on to Windows XP Professional
        Creating a User Account


Before You Begin

When you set up Windows XP Professional, you have to provide information about how you want to install the operating system. The procedures in these release notes help you to provide the necessary information. To ensure a successful installation, complete the following tasks, which are described in the sections that follow,
before you install Windows XP:

   * Make sure your hardware components meet the minimum requirements.

   * Obtain compatible hardware and software, such as upgrade packs and new drivers.

   * Obtain network information.

   * Back up your current files in case you need to restore your current operating system.

   * Determine whether you want to perform an upgrade or install a new copy of Windows XP Professional.

   * If you're installing a new copy, identify and plan for any advanced setup options you might want.


Hardware Requirements

Before you install Windows XP Professional, make sure your computer
meets the following minimum hardware requirements:

   * 233 megahertz (MHz) Pentium or higher microprocessor (or
     equivalent)
   * 128 megabytes (MB) recommended (64 MB of RAM minimum;
     4 gigabytes (GB) of RAM maximum)
   * 1.5 GB of free space on your hard disk
   * VGA monitor
   * Keyboard
   * Mouse or compatible pointing device
   * CD-ROM or DVD drive

For network installation:

   * Compatible network adapter card and related cable
    
     For more information, see the Hardware Compatibility List (HCL)
     or see "Checking Hardware and Software Compatibility" later in
     this document.

   * Access to the network share that contains the Setup files


Checking Hardware and Software Compatibility

The Windows XP Setup Wizard automatically checks your hardware and  software and reports any potential conflicts. To ensure a successful installation, however, you should determine whether your computer hardware is compatible with Windows XP Professional before you start  the wizard.

You can view the Hardware Compatibility List (HCL) at the Microsoft
Web site:

http://www.microsoft.com/hcl/
 

Important: Windows XP Professional supports only those devices  listed in the HCL. If your hardware isn't listed, contact  the hardware manufacturer and request a Windows XP Professional  driver for the component. To ensure that programs using 16-bit  drivers function properly afterwards, request 32-bit drivers  from the software vendor.

During the setup process, you can use upgrade packs to make your  existing software compatible with Windows XP Professional. Upgrade packs are available from the appropriate software manufacturers.


Obtaining Network Information

If your computer won't be connected to a network, you can skip this section.

First, you need to decide whether your computer is joining a domain or a workgroup. If you don't know which option to choose, or if your computer won't be connected to a network, select the workgroup option. (You can always join a domain after you install Windows XP Professional.) If you select the domain option, ask your network  administrator to create a new computer account in that domain or reset
your existing account.

If your computer is currently connected to a network, request the following information from your network administrator before you begin the setup process:

   * Name of your computer
   * Name of the workgroup or domain
   * TCP/IP address (if your network doesn't have a Dynamic Host
     Configuration Protocol (DHCP) server)

To connect to a network during the setup process, you must have the correct hardware installed on your computer and be connected by a network cable.


Backing Up Your Files

If you're upgrading from an earlier version of Windows, you should back up your current files. You can back up files to a disk, a tape drive, or another computer on your network.

How you back up your files depends on your current operating system. If your computer is running Microsoft Windows 95 or Windows 98, you  might need to install the Windows Backup program. If you're using  Windows NT 4.0, Windows Backup is installed by default. You must have a tape drive installed to use the Backup tool in Windows NT.

For more information about installing or using Windows Backup, see  Help and Support Services.


Upgrading vs. Installing a New Copy

After you start the Windows XP Setup Wizard, one of the first decisions you have to make is whether to upgrade your current operating system or to perform an entirely new installation. During the setup process, you must choose between upgrading or installing a new copy of Windows (a "clean install").

During an upgrade, the Windows XP Setup Wizard replaces existing Windows files but preserves your existing settings and applications. Some applications might not be compatible with Windows XP Professional and therefore might not function properly after an upgrade. You can  upgrade to Windows XP Professional from the following operating systems:

   * Windows 98 (all versions)
   * Windows Millennium Edition
   * Windows NT 4.0 Workstation (Service Pack 6 and later)
   * Windows 2000 Professional (including service packs)
   * Windows XP Home Edition

If your computer is currently running an unsupported operating  system, you must install a new copy. The wizard installs Windows XP Professional in a new folder. After the installation is complete, you
will have to reinstall applications and reset your preferences.


Running Windows XP Setup

The Windows XP Setup Wizard gathers information, including regional  settings, names, and passwords. The wizard then copies the appropriate files to your hard disk, checks the hardware, and configures your  installation. When the installation is complete, you're ready to log  on to Windows XP Professional. Note that your computer restarts several times during the process.

How you start the Windows XP Setup Wizard depends on whether you're upgrading or installing a new copy of Windows. Determine your  installation method, locate the appropriate section in these release notes, and then follow the procedures for your Setup scenario.


If You're Installing a New Copy (Clean Install)

If your computer has a blank hard disk or your current operating system isn't supported, you need to start your computer by using the  Windows XP Professional CD. Some newer CD-ROM drives can start the  installation from the CD and automatically run the Windows XP Setup  Wizard.

To install a new copy by using the CD:

  1. Start your computer by running your current operating system, and then insert the Windows XP Professional CD into your CD-ROM drive.

  2. If Windows automatically detects the CD, click Install Windows.  The Windows XP Setup Wizard appears. If Windows doesn't automatically detect the CD, click Start, and then click Run. Type the following path to the setup
    file, replacing 'd' if necessary with the letter of your CD-ROM drive:
         
    d:\setup.exe

  3. Press ENTER.

  4. When prompted to choose an installation type, select New Installation, and then click Next.

  5. Follow the instructions that appear on your screen.

To install a new copy by using a network connection:

  1. To install a new copy by using a network connection:

  2. Using your existing operating system, establish your connection to the shared network folder that contains the Setup files. You can also use an MS-DOS or network installation disk to connect to the network server, if the disk contains network client software.

  3. Your network administrator will be able to provide you with this path.

  4. If your computer is currently running Windows 98, Windows Millennium Edition, or an earlier version of Windows NT, then at the command prompt, type the path to the file setup.exe.
     

  5. Press ENTER.

  6. Follow the instructions that appear on your screen.


If You're Upgrading

The upgrade process is simple. The Windows XP Setup Wizard detects and installs the appropriate drivers, or it creates a report listing  devices that couldn't be upgraded, so you can be sure your hardware  and software is compatible with Windows XP Professional.

To upgrade from the CD:

  1. Start your computer by running your current operating system, and then insert the Windows XP Professional CD into your CD-ROM drive.

  2. If Windows automatically detects the CD, the Windows XP  Professional CD dialog box appears. To start your upgrade,  click Install Windows.

  3. If Windows doesn't automatically detect the CD, click Start, and then click Run. Then type the path to the setup  file, replacing 'd' if necessary with the letter of your CD-ROM drive:
         
    d:\setup.exe
         
    Press ENTER.

  4. When prompted to choose an installation type, select Upgrade, and then click Next.

    Follow the instructions that appear on your screen.


To Upgrade from a network connection:

Using your current operating system, establish a connection to the shared network folder that contains the Setup files. If you have an MS-DOS or network installation disk that contains network client software, you can use that disk to connect to the shared folder.

Your network administrator will be able to provide you with this path.

At the command prompt, type the path to the file setup.exe.

Press ENTER.

Select Upgrade, and then click Next.

Follow the instructions that appear on your screen.
 

Collecting User and Computer Information

The Windows XP Setup Wizard helps you gather information about you and your computer. Although much of this installation process is  automatic, you might need to provide information or select settings on the following pages, depending on the current configuration of your  computer:

Licensing Agreement. If you agree with the terms and want to  continue the setup process, select I accept this agreement.

Select Special Options. Customize the Windows XP installation, language, and accessibility settings for new installations. You can set up Windows XP to use multiple languages and regional settings.

Select a File System. Windows XP Professional can automatically  convert partitions on your hard disk to NTFS, the recommended  file system for Windows XP Professional, or you can choose to  keep your existing file systems. If you're upgrading, the wizard uses your current file system.

Regional Settings. Change the system and user locale settings for different regions and languages.

Personalize Your Software. Type the full name of the person to  whom this copy of Windows XP Professional is licensed and, optionally, the organization.

Computer Name and Administrator Password. Type a unique computer name that differs from other computer, workgroup, or domain names on your network. The wizard suggests a computer name, but you can change the name.

During the installation, the wizard automatically creates an  Administrator account. When you use this account, you have full rights over the computer's settings and can create user accounts  on the computer. That is, logging on as an Administrator after you install Windows XP Professional gives you administrative privileges that you need to log on and manage your computer.

Type  a password for the Administrator account. For security reasons,  you should always assign a password to the Administrator account. Take care to remember and protect your password.

Date and Time Settings. Verify the date and time for your region, select the appropriate time zone, and then select whether you want Windows XP Professional to automatically adjust for daylight saving time.

Networking Settings. Unless you're an advanced user, select the Typical settings option for your network configuration. To manually configure network clients, services, and protocols, select the Custom settings option.

Workgroup or Computer Domain. During the setup process, you must  choose to join either a workgroup or a domain.

For more information, see "Providing Networking Information" later in this document.

Network Identification Wizard. If your computer is connected to a network, this wizard prompts you to identify the users who  will be using your computer. If you indicate that you're the only user, you're assigned Administrator rights.


Providing Networking Information

During or after the setup process, you need to join either a workgroup or a domain. If you won't be working on a network, choose to join a  workgroup.


Joining a Workgroup


A workgroup is one or more computers with the same workgroup name (for example, a "peer-to-peer" network). Any user can join a workgroup by  specifying the workgroup name - you don't need special permissions to  join a workgroup. You must provide an existing or new workgroup name,  or you can use the workgroup name that the Windows XP Setup Wizard suggests.


Customizing Setup Using Unattended Setup Mode

You can customize the installation of Windows XP Professional. By  using unattended Setup mode, you can preset information so that you  don't have to manually enter it during the setup process.

By using an answer file, network administrators and experienced users  can perform a new installation in unattended Setup mode. In unattended Setup mode, no user intervention is required during the setup process,
because the answer file contains all of the information that the  Windows XP Setup Wizard requires, including acceptance of the license  agreement, computer name, and network adapter. Answer files can help  you quickly install Windows XP Professional on more than one computer.

A sample answer file, Unattend.txt, is included in the i386 folder on  the Windows XP Professional CD. By using the file as a template, you can create your own answer file to customize the setup process.


Starting Windows XP Professional

After gathering the required information, the Windows XP Setup Wizard  completes the installation. Your computer restarts several times, and  then Windows XP Professional prompts you to log on. After you log on,
if you have Administrator rights, you can activate your copy of Windows XP Professional, create user accounts, and reconfigure any settings that you entered during the setup process.


Logging on to Windows XP Professional

When you install Windows XP Professional, Setup prompts you to create a user account for yourself and one for each person who regularly uses the computer, whether in an office or home.

Important: If you have Administrator rights, you can assign permissions to each user account. For example, you can determine whether a user may install software, view other users' documents, or operate network resources such as printers and servers.

 
Creating a User Account

Your user account identifies your user name and password, the groups you're a member of, which network resources you have access to, and your personal files and settings. Each person who regularly uses the computer should have a user account.

The user account is identified by a user name and a password, both of which the user types when logging on to the computer. You can create individual user accounts after logging on to the computer by using an account with Administrator  rights.

To create a user account:
 

  1. Log on to the computer as a user with Administrator rights.

  2. Click Start, click Control Panel, and then click User Accounts.

  3. Click Add.

  4. Follow the instructions that appear on your screen. 

What is Product Activation

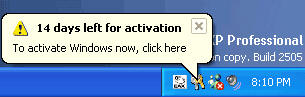
Microsoft Product Activation is an anti-piracy technology designed to verify that software products have been legitimately licensed. This aims to reduce a form of piracy known as casual copying. Activation also helps protect against hard drive cloning. Activation is quick, simple, and unobtrusive, and it protects your privacy.

Product Activation works by verifying that a software program's product key has not been used on more personal computers than intended by the software's license. You must use the product key in order to install the software and then it is transformed into an installation ID number. You use an activation wizard to provide the installation ID number to Microsoft either through a secure transfer over the Internet, or by telephone. A confirmation ID is sent back to your machine to activate your product.

The installation ID number includes an encrypted form of the product ID and a hardware hash, or checksum. No personally identifying data is included or required. The confirmation ID is simply an unlocking code for the Windows XP installation on that particular PC.

If you overhaul your computer by replacing a substantial number of hardware components, it may appear to be a different PC. You may have to reactivate Windows XP. If this should occur, you can call the telephone number displayed on the activation screen to reactivate the software.

Activate Windows XP Right Away

If you have not activated Windows XP, you will be reminded each time you log in and at common intervals until the end of the activation grace period of 30 days. If you have not activated Windows XP within this timeframe, you will need to do so to continue using it.

If you choose to activate your product over the Internet, upon your submission the activation wizard will detect your Internet connection and connect to a secure server to transfer your installation ID to Microsoft. A confirmation ID is passed back to your computer, automatically activating Windows XP. This process normally takes just a few seconds to complete. No personally identifiable information is required to activate Windows XP.

To activate Windows XP over the telephone, you can simply call a toll-free* number displayed on your screen. A customer service representative will ask for the installation ID number displayed on the same screen, enter that number into a secure database, and return a confirmation ID to you. Once you have typed the confirmation ID, the activation process is complete.

Product Registration

Product activation is not the same as product registration. As discussed above, product activation is required and is completely anonymous. Product registration, on the other hand, is completely optional. You may opt to provide personal information, such as your e-mail address, for product registration purposes. Registration entitles you to receive information about product updates and special offers directly from Microsoft. All registration information provided is stored securely and no information is ever loaned or sold to third parties.

Product Activation Protects Your Privacy at Every Step

Activation data and any optional registration data provided to Microsoft is stored in a secure facility. Microsoft's privacy statement is displayed during the activation process.

* Toll-free telephone numbers are available in all countries whose telephony infrastructures provide for them. The telephone numbers to call are displayed when telephone activation is chosen.


Windows XP Product Activation Overview
 

Due to piracy and other forms of unauthorized use, users cannot always be sure that they have a genuine copy of Windows XP. The goal of product activation is to reduce a form of piracy known as casual copying or "softlifting". Casual copying is the sharing and installation of software that is not in compliance with the software's end user license agreement, or EULA, and is estimated to contribute to half of all pirated installations. Microsoft developed Product Activation for Windows to help ensure that each Windows XP license is installed in compliance with the EULA and is not installed on more than the limited number (usually one) of computers allowed by the product EULA. We have worked to make it as easy as possible to activate a licensed installation of Windows XP.

To learn more about Microsoft's licensing policies, open EULA

During software installation, the setup wizard prompts you to enter a product key usually located on the back of the Windows CD-ROM folder. The product key is a 25 character alphanumeric code shown in five groups of five characters each (for example, BCDFG-12345-HJKLM-67890-NPQRS). Keep the product key in a safe location and do not share it with others. This product key forms the basis for your ability to install and use Windows.

The product key also forms the basis for the product ID that is created when Windows XP is installed. Each licensed instance of Windows XP has a unique Product ID. The Product ID has 20 characters arranged like this: 12345-123-1234567-12345. It is listed in the properties for My Computer.

For purposes of product activation only, a non-unique hardware identifier is also created from general information that is included in the system components. At no time are files on the hard drive scanned, nor is personally-identifiable information of any kind used to create the hardware identifier. Product activation is completely anonymous. To ensure your privacy, the hardware identifier is created by what is known as a "one-way hash". To produce a one-way hash, information is processed through an algorithm to create a new alphanumeric string. It is impossible to calculate the original information from the resulting string.

The hardware identifier is used together with the product ID to create a unique installation ID. Whether you choose to activate by using an Internet connection or by speaking with a Microsoft customer service representative, the installation ID is the only piece of information required to activate Windows XP.

If you activate via an Internet connection, the installation ID is sent automatically. When you decide to activate over the Internet, Windows attempts to establish an online connection to Microsoft by way of the Internet. If you do not subscribe to an Internet Service Provider but do have a modem connected to a phone line, the wizard detects the modem and attempts to make a direct connection to Microsoft.

If an online connection cannot be established, you are prompted to contact a customer service representative by telephone. In that message, the installation ID is displayed to you. The customer service representative will ask you to read the installation ID over the telephone.

Activation is completely anonymous; no personally identifiable information is required. The installation ID records an association of the product ID to your computer and a confirmation is sent back. The product key can now be used to install Windows on that computer an unlimited number of times. However, if you need to install Windows on a different computer using that product key, you might need to contact a Microsoft customer service representative by telephone.

Until you have activated your copy of Windows XP, an Activate icon appears in the system tray. You can click on the icon to initiate activation. This icon will not appear in the system tray after you have activated Windows XP.

You have a 30-day grace period in which to activate your Windows product installation. If the grace period expires and you have not completed activation, all features of Windows XP except the product activation feature will stop working.